More articles on this plugin:
Save for later, Save & Share WooCommerce Cart: Quick Start Guide
The plugin is ready to use immediately after activation. Once you’ve installed and activated the Save for later, Save & Share WooCommerce Cart plugin, you can navigate to the WooCommerce cart page. If you’re using the Classic Cart, you’ll see something like this (the result will vary visually depending on the theme you’re using):

If you’re using the Blocks Cart, after activating the Save for later, Save & Share WooCommerce Cart the cart page will appear something like this:

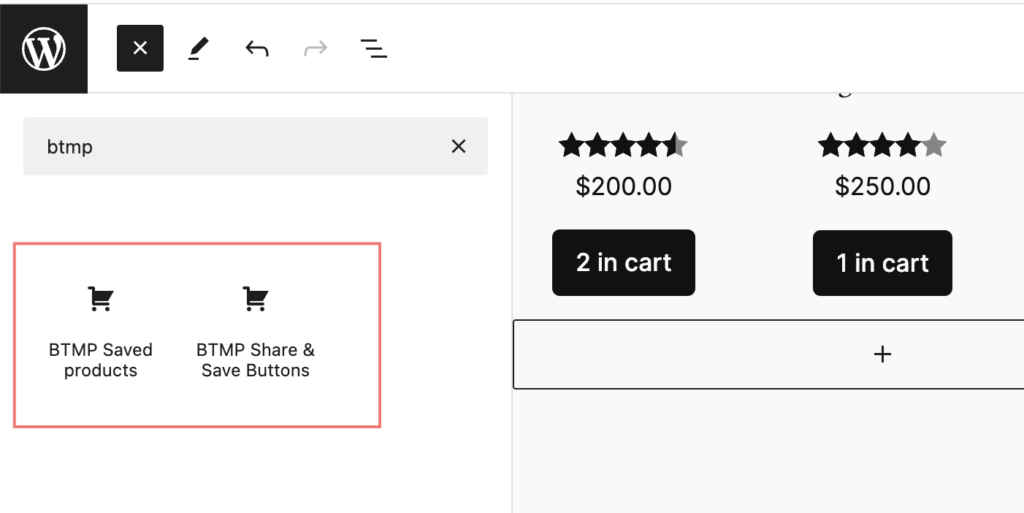
In the case of using the Blocks Cart, the “Save for later” link will be added automatically. However, you’ll need to manually add the Share/Save buttons and the Saved for Later section using the appropriate blocks, as Blocks Cart doesn’t support the same hooks as the classic cart:

Settings Overview
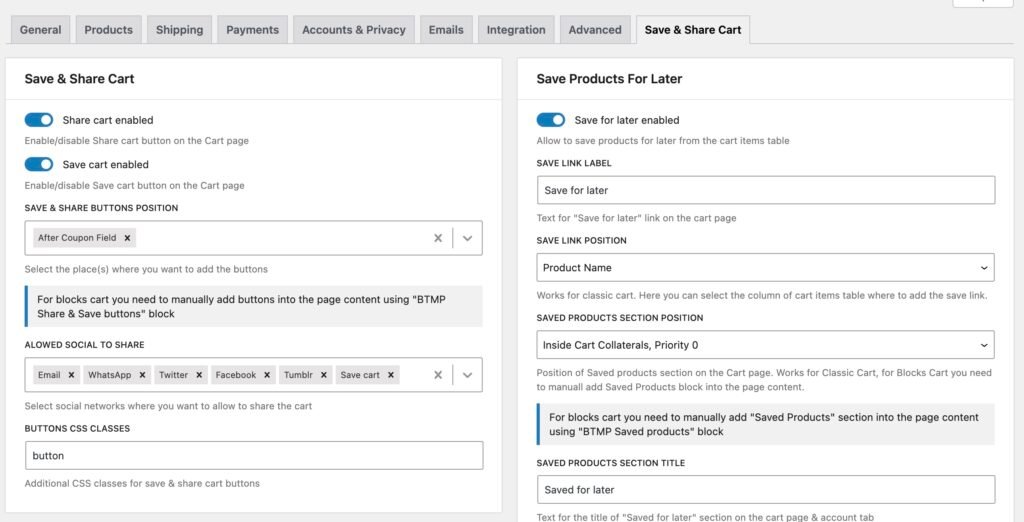
For more precise control over how the plugin operates, you need to use the Settings page. You can find the plugin settings by navigating to WooCommerce > Settings > Save & Share Cart:

Save & Share Cart Section
- Share cart enabled – enable/disable share cart functionality.
- Save cart enabled – enable/disable save cart functionality. If this functionality is enabled, Saved Carts tab will be automatically added to the My Account page.
- Save & Share buttons position – select the position where you want to display the Save & Share Buttons. The Save & Share buttons are added as a single block, so you can select the position for both buttons at once. Please note that this option works only for the Classic cart. For the Blocks cart, you’ll need to manually add the Save & Share Buttons block into the page content.
- Allowed Social to share – select the list of social networks to display in the Share Cart popup. If you have the Save Cart Enabled option active, in addition to social networks, the Save Cart link will always be added to the Share Cart popup.
- Buttons CSS Classes – here you can specify additional CSS classes to apply to the Share Cart and Save Cart buttons. You may need this option to adjust the buttons’ appearance to match your current theme styles.
Save Products Section
- Save for later enabled – enable or disable the ability for users to save individual products to a list for later purchase from that list. If this functionality is enabled, Saved for later tab will be automatically added to the My Account page.
- Save link label – text of the Save for later link in the Cart table.
- Save link position – determine the position of the Save for Later link in the Cart table. Please note, this option works only for the Classic cart. For the Blocks cart, the Save for Later link will always be located inside the price column.
- Saved products section position – specify the position of the Saved for Later section on the cart page. Please note, this option works only for the Classic cart. For the Blocks cart, you’ll need to manually add this section to the page content using the appropriate block.
- Saved products section title – define the title of the Saved for Later section. This text will be applied for the Classic cart, as a block for the Blocks cart, and as the title for the appropriate My Account tab.